Create a New tile or New Object
Come here for tutorials and 3d training. The aim is to point out good 3d training sites or methods.

Moderators: Winterhawk99, Mermut, Bannor Bloodfist

Post Reply
User avatar
Bannor Bloodfist
Posts: 1244
Joined: Fri Oct 09, 2009 11:45 pm
ctp: Yes
dla: Yes
TBotR: Yes
nwnihof: Yes

Create a New tile or New Object

Post by Bannor Bloodfist »

The intention of this "tutorial" is pretty basic, yet can be used to learn some new things or different ways of accomplishing things you already know.

I will start the whole project with ANY exterior tile from any set you choose, the purpose of this is just to get the basic things you need and have them available without having to create them from scratch. In my opinion, this is MUCH faster than attempting to create new MDL base, mainlights, animation dummy etc, just take an existing tile, rename those objects and save it as a new tile to work from. Then delete everything else in the tile as we won't need it for this session:

Image

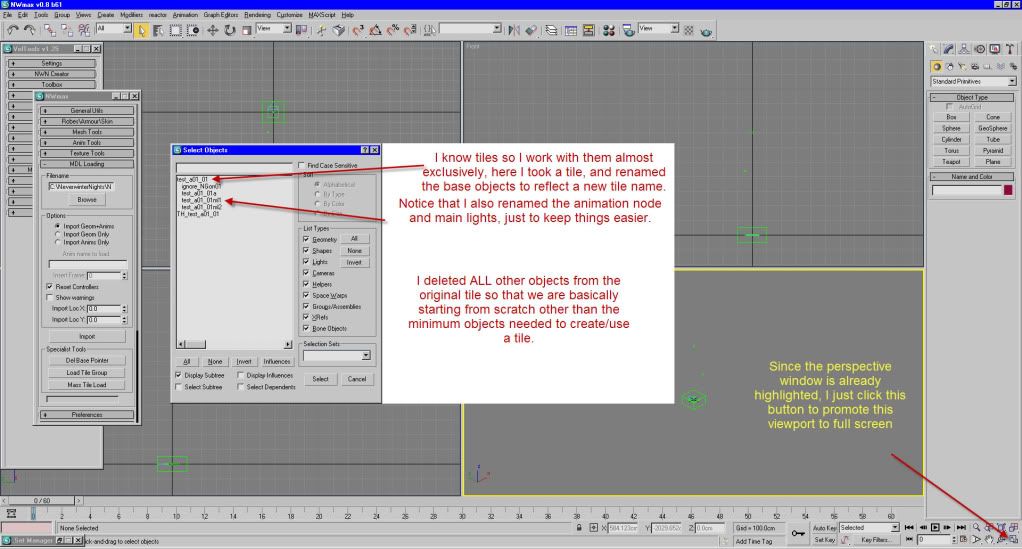
That image pretty much shows what I am talking about.

Now, since we are discussing a tile, all tiles need some sort of ground surface, since we deliberately deleted everything earlier, we will have to create one from scratch.

This next image will show how to create and use a basic object.

Image

That is a pretty simple start. There are several "primitive" objects, and several more advanced primitives which we will get to a bit later.

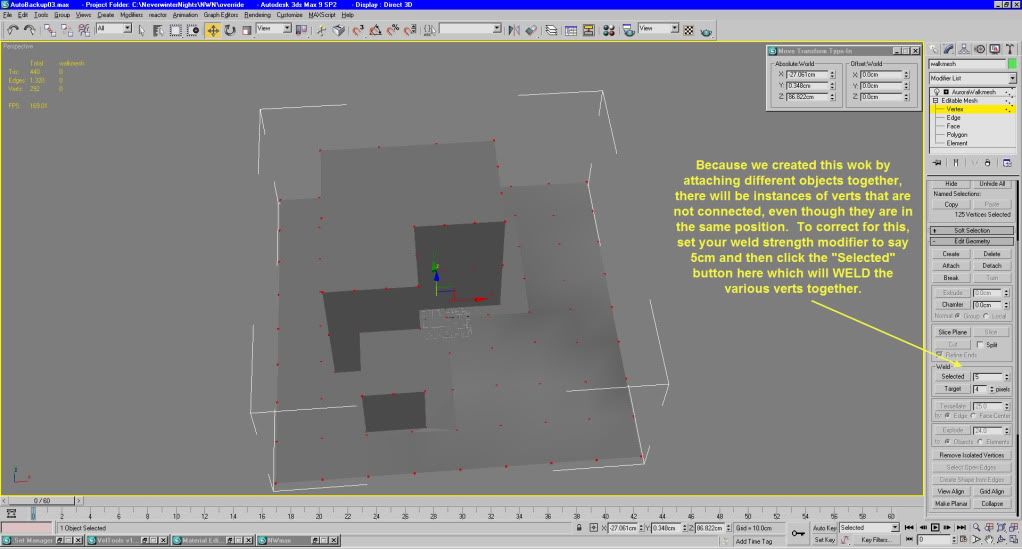
Using the F12 (Move/Transform option) we center this base object, and then add the proper modifiers. Pay attention to the text in this shot, as it explains a few extra things.

Image

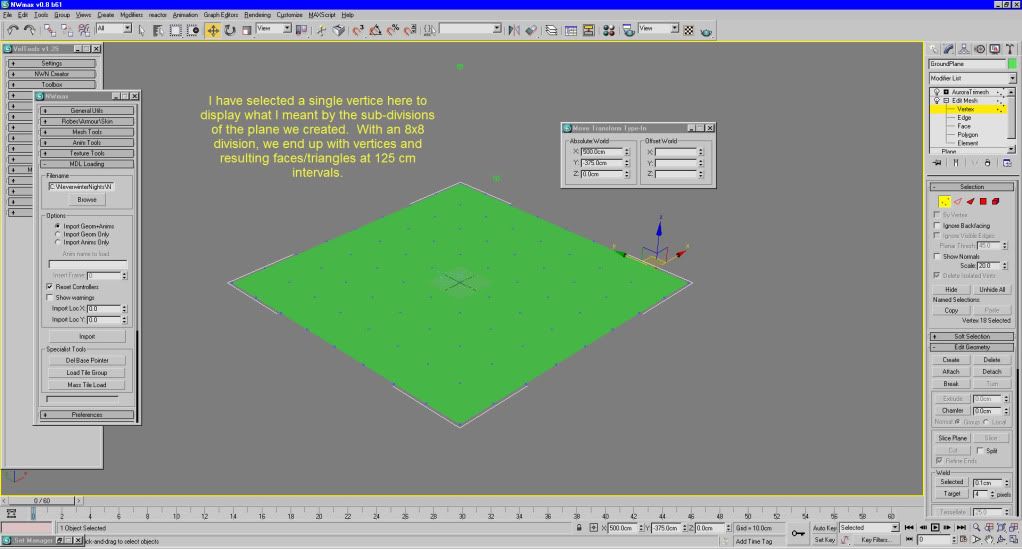
For ground planes you should set your segments length/width to 8 each. This will give us 125cm centers for the vertices on the ground. This is the default setting in about 85% of tilesets out there. You CAN still see the location to make those adjustments though, on far right of the above screenshot.

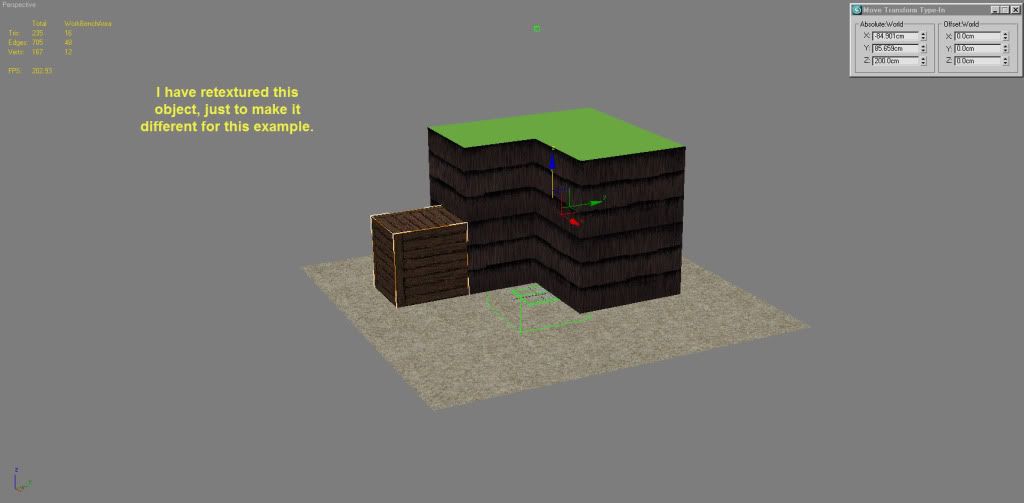
Here is an example of what I mean:
Image

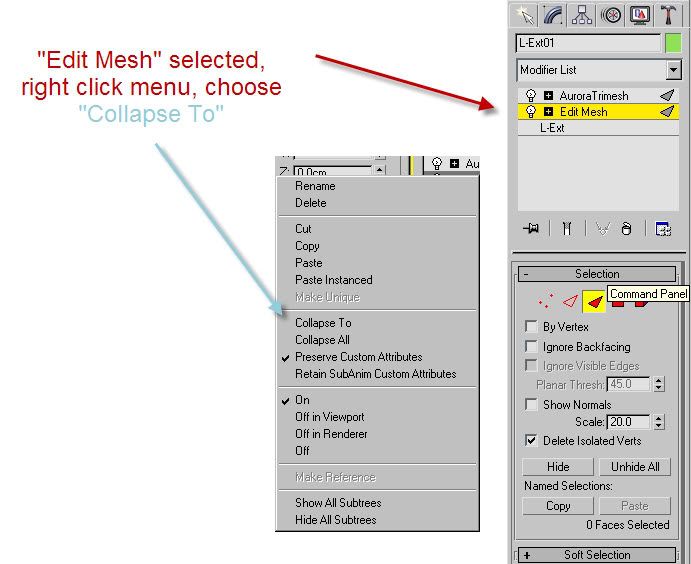
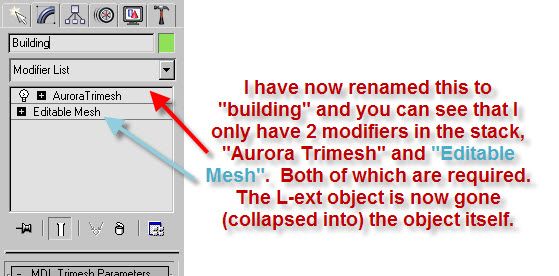
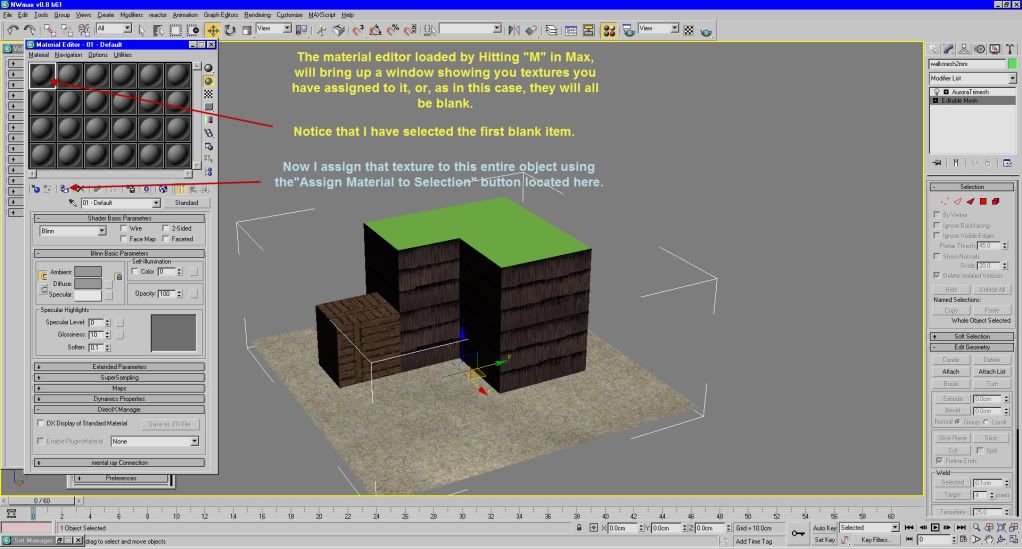
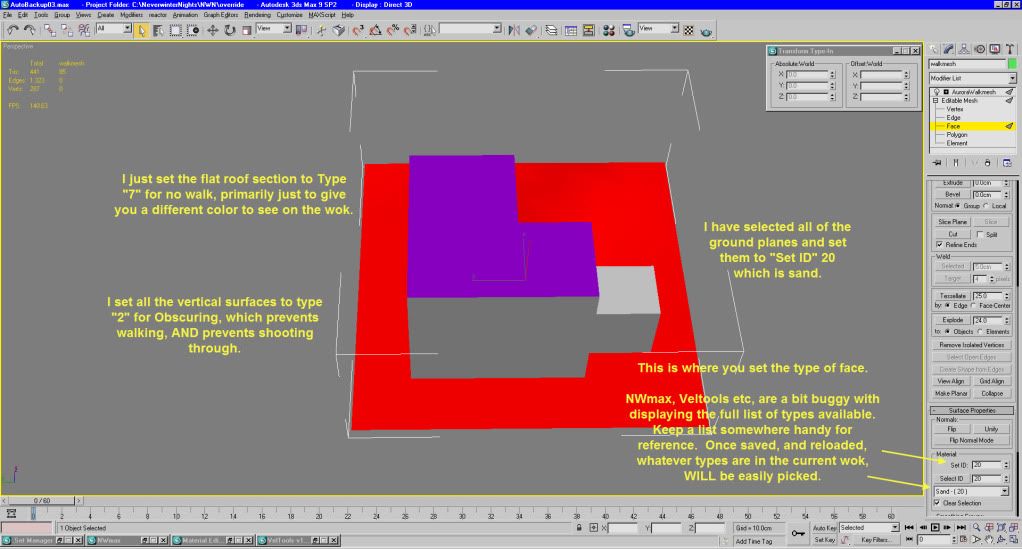
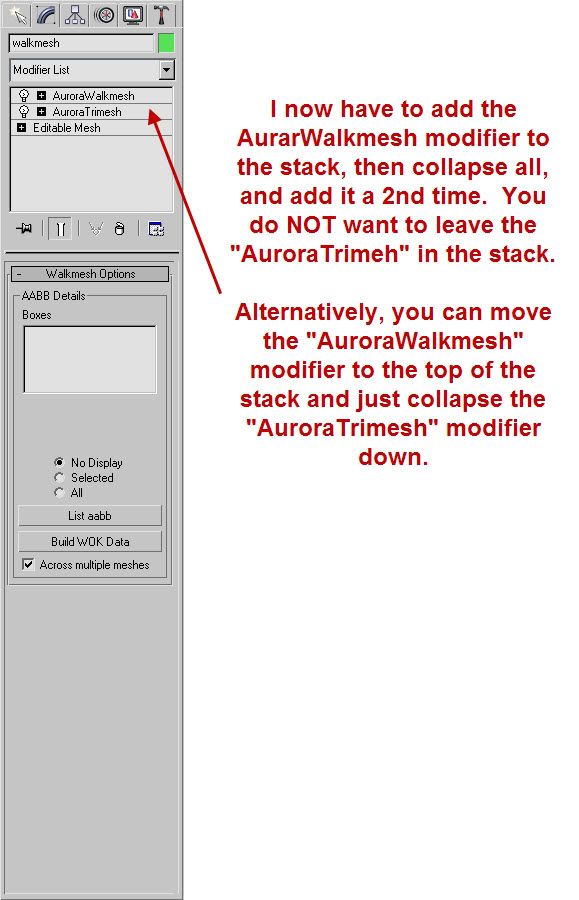
Next, we need to add the normal modifiers to this object, and rename it properly.

Image

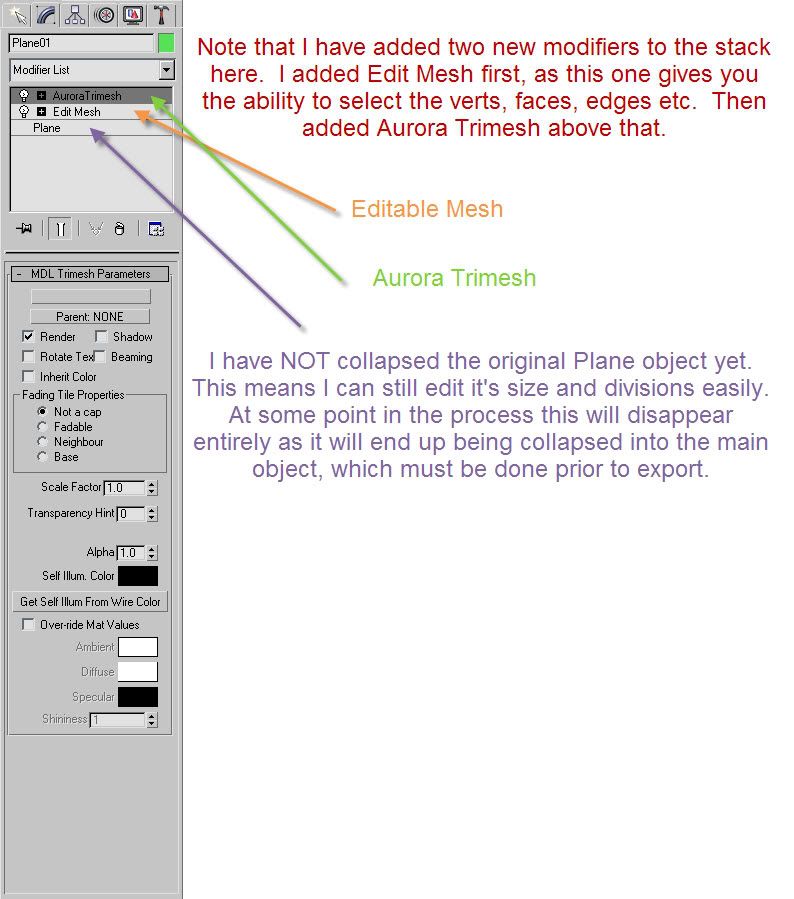
Note that if you just collapse the first modifier there, the one labeled "Plane" which, is the type of object that we created according to Max, you end up with the "Editable Mesh" already created for you, OR, you can add the modifiers to the stack. ANY modifier in the stack can be dragged up or down in the stack to adjust how things work. Most of the time, moving them around is not necessary, but there will be times when you end up with a modifier that is higher in order than the "Aurora Tirmesh", and it in reality should be below that, and typically above the "Editable Mesh" modifier. Things like "UVW mapping", or "Smoothing" etc.

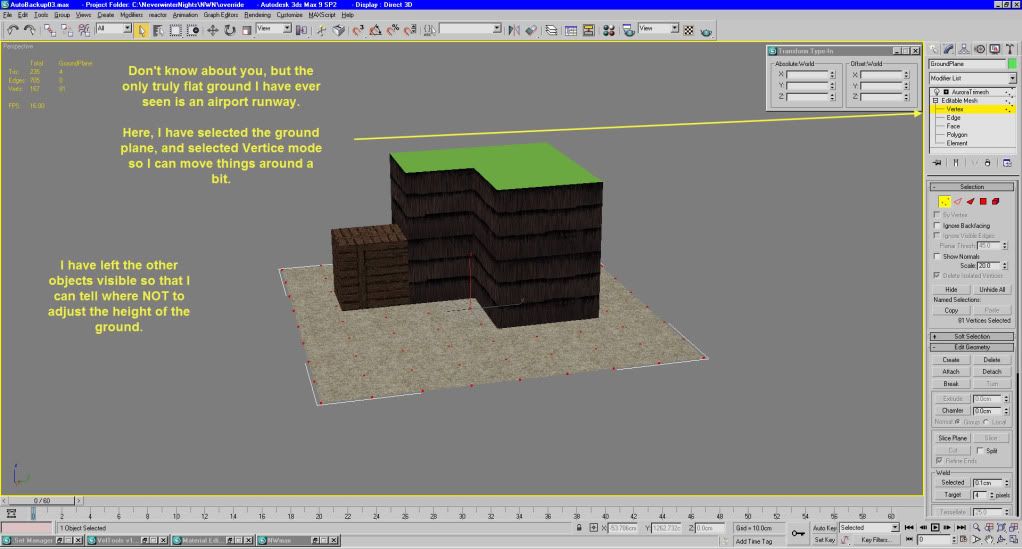
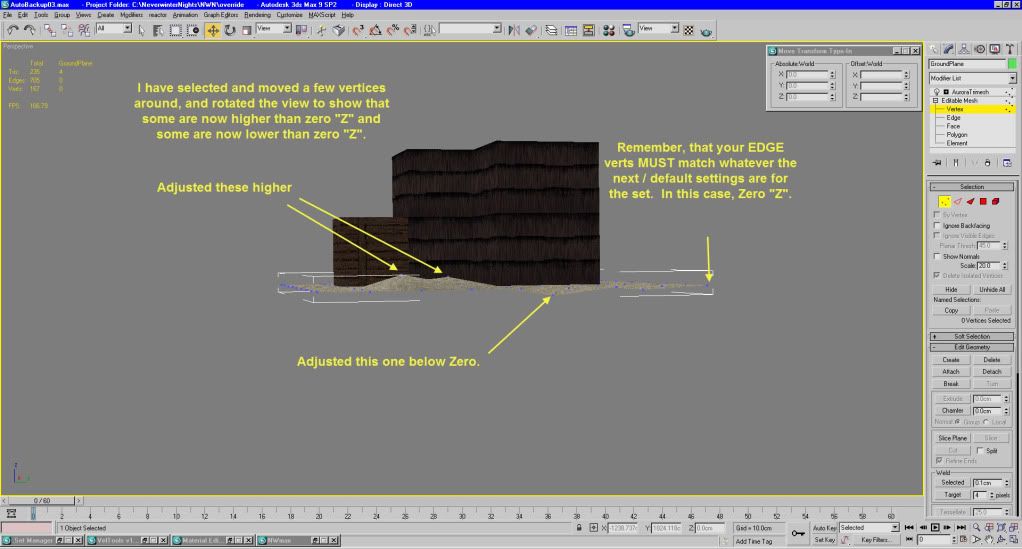
Ok, so now we have a tile with a flat plane of ground... pretty boring eh?

Let's go create something more interesting.

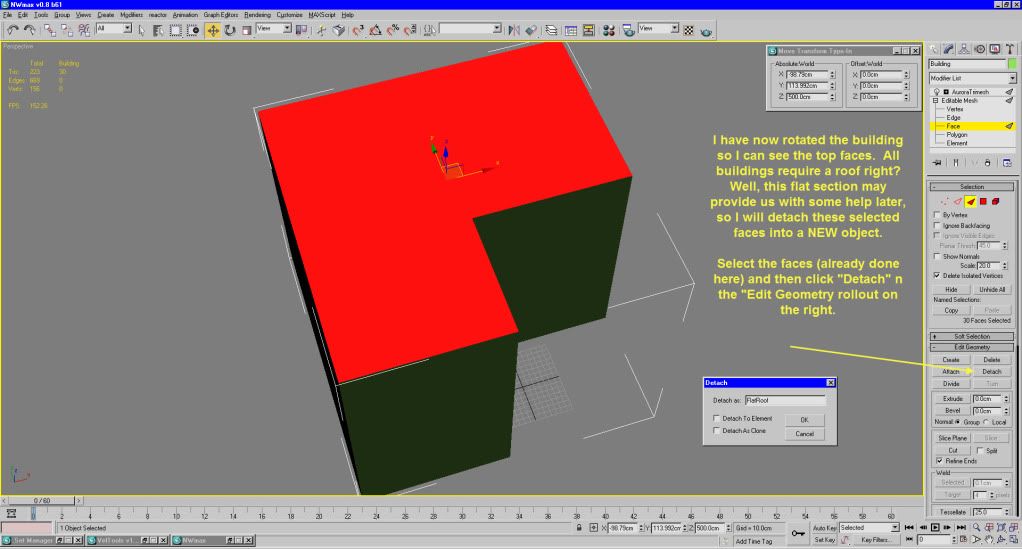
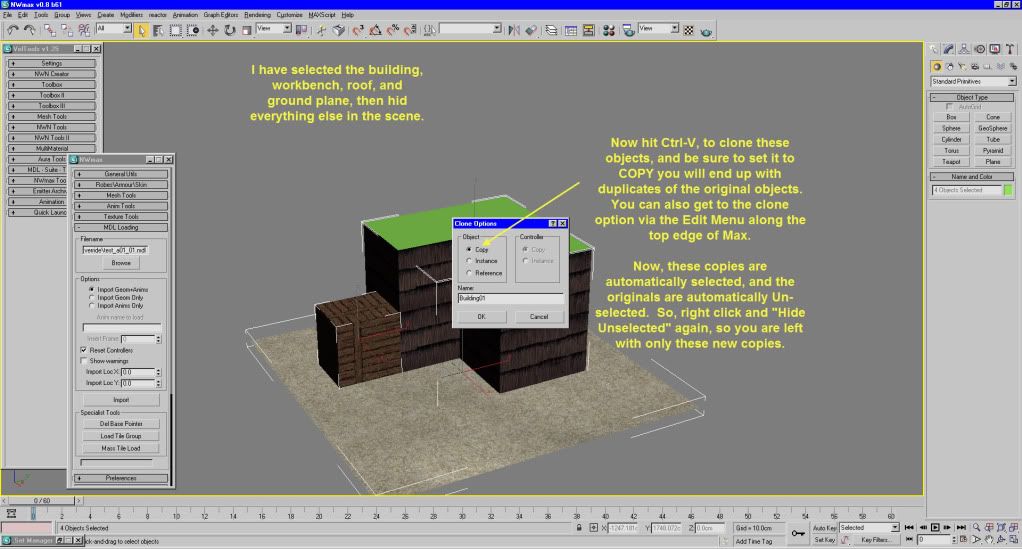
Using the "Extended Primitives" we find something called "L-Ext", which will give us an object, shaped like the letter "L" but in 3 dimensions.

Image

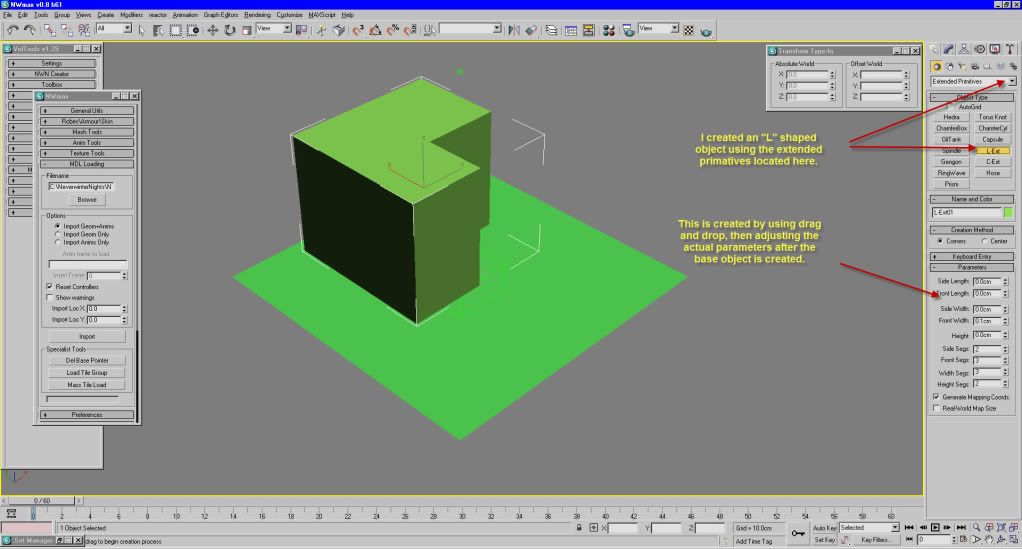
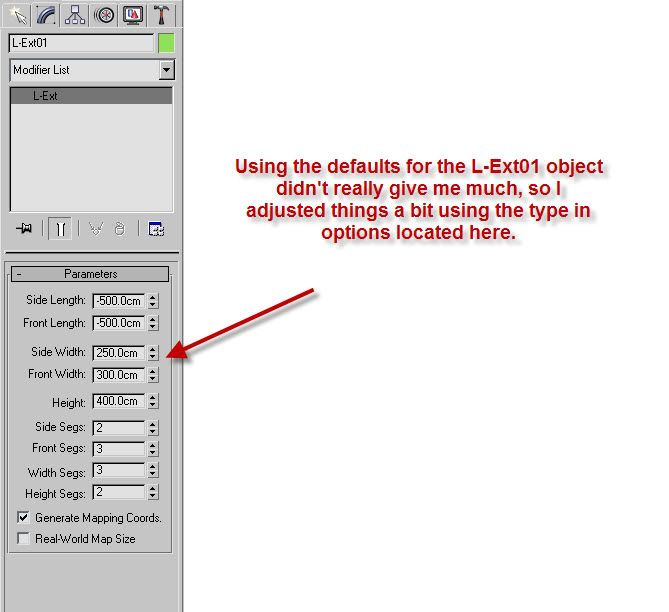
Notice the options for this object:

Image
Image


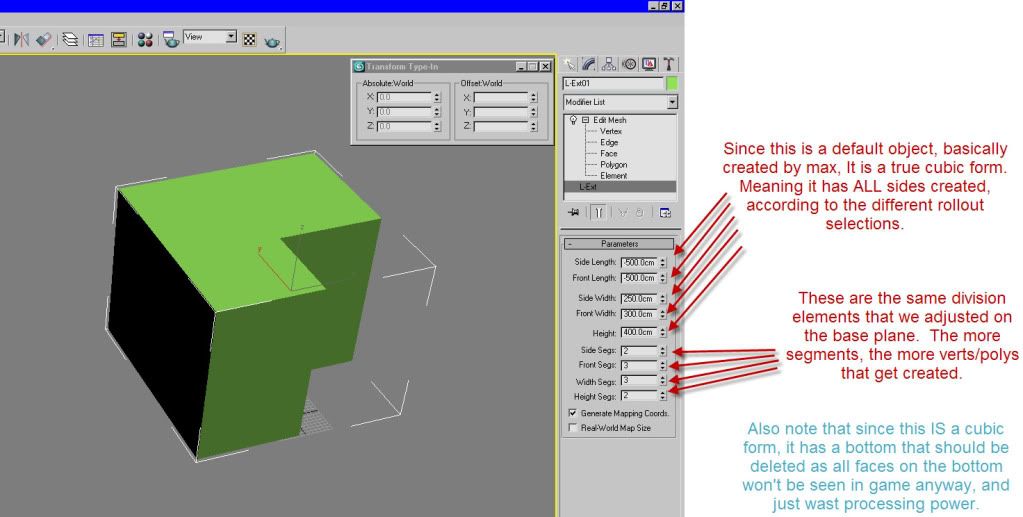
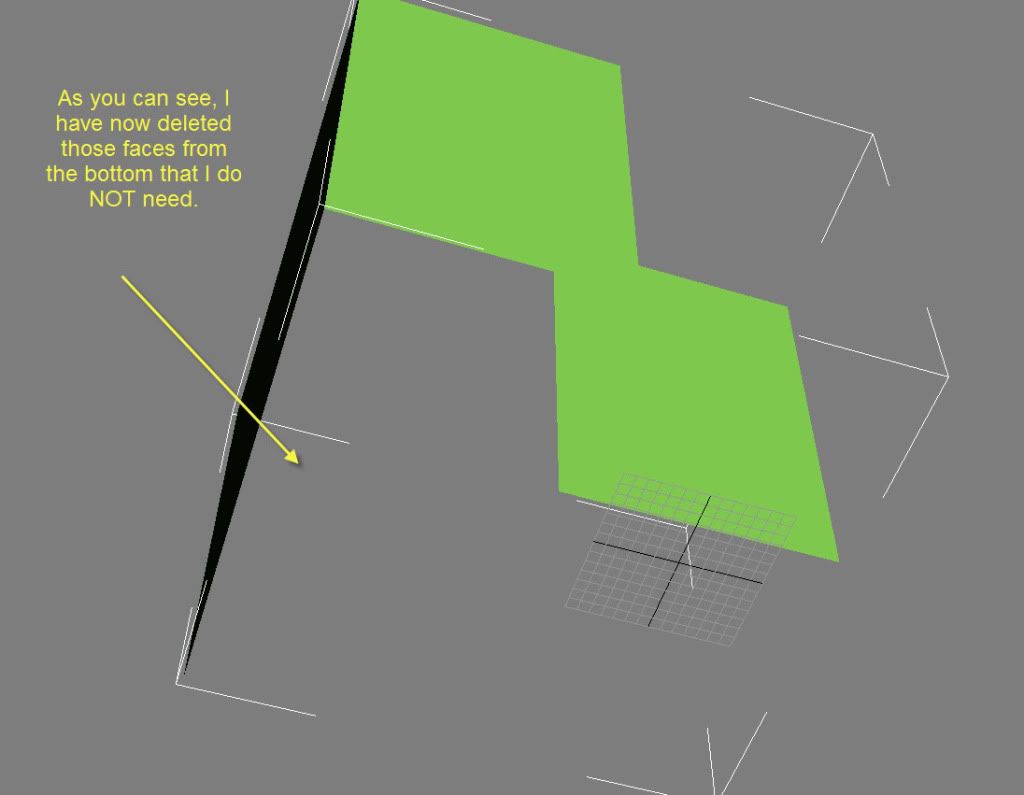
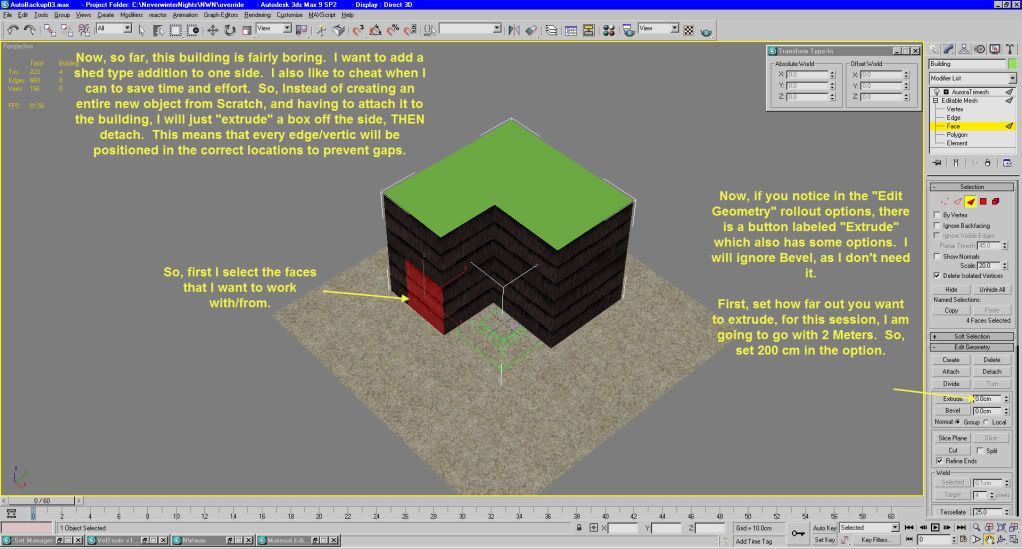
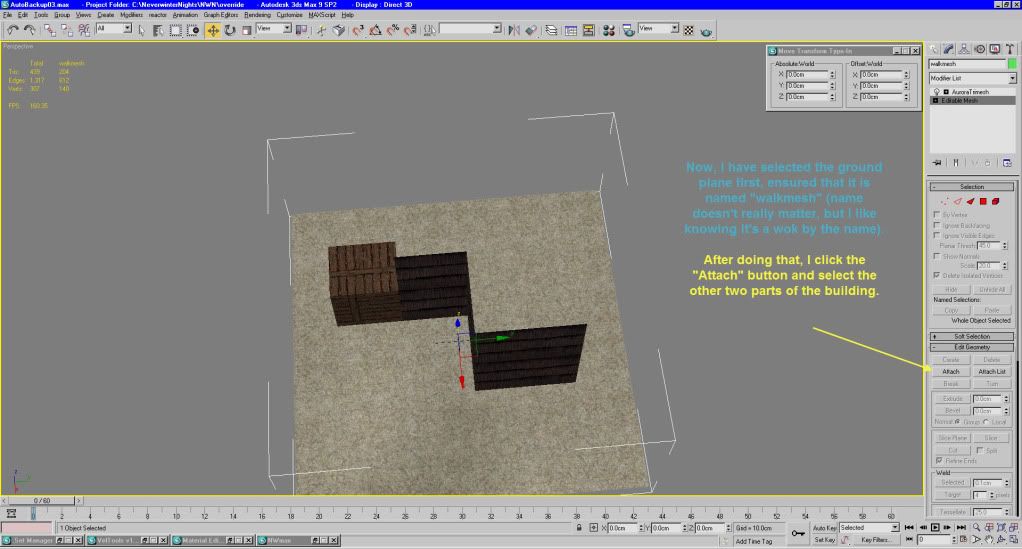
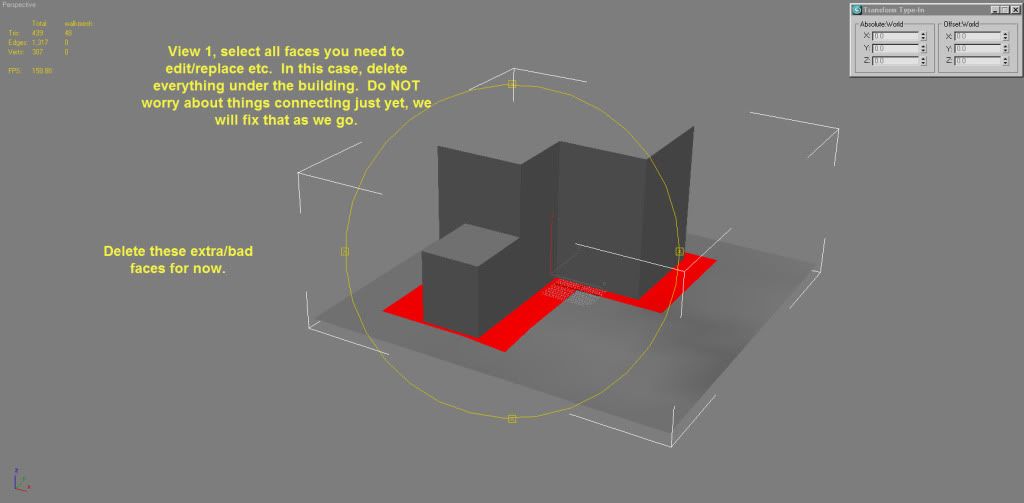
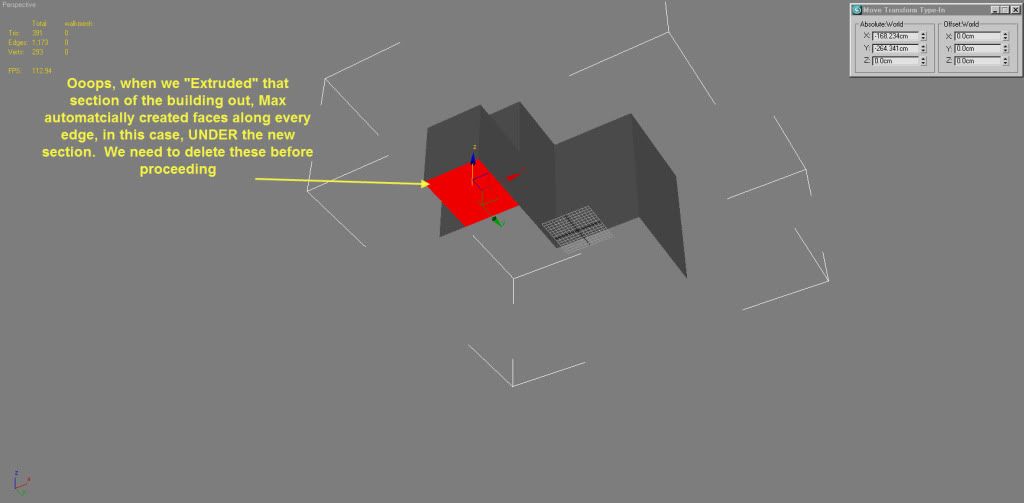
After getting the base object (Building) created, I need to remove some extra faces that get created by Max primitives.

Image

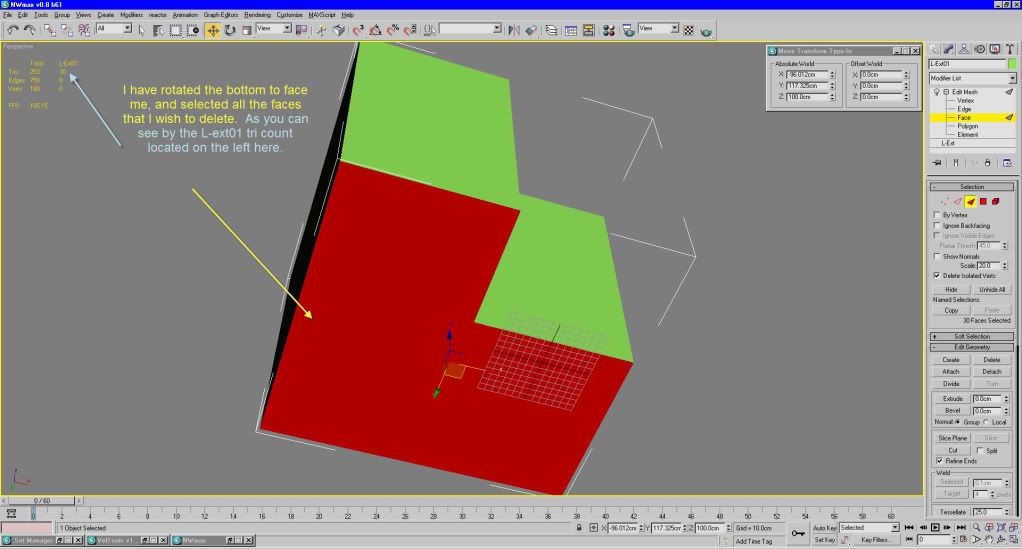
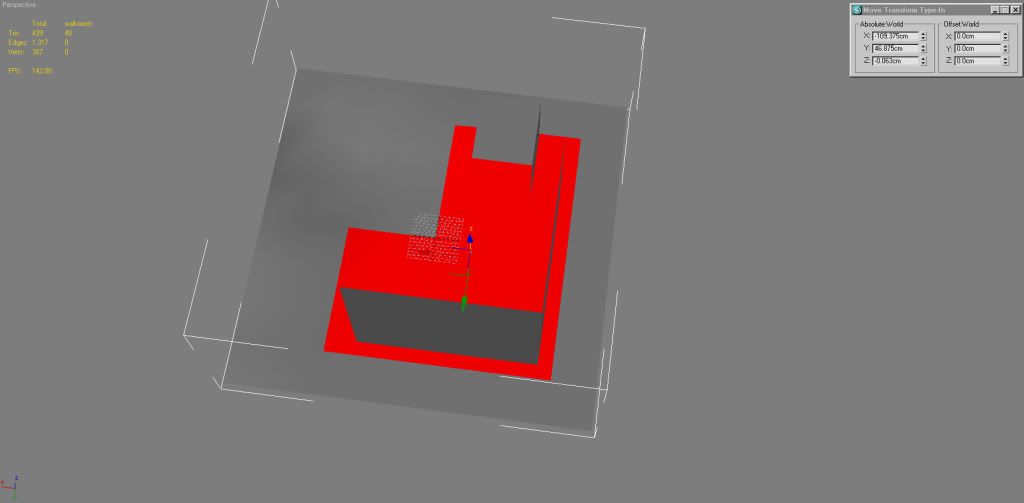
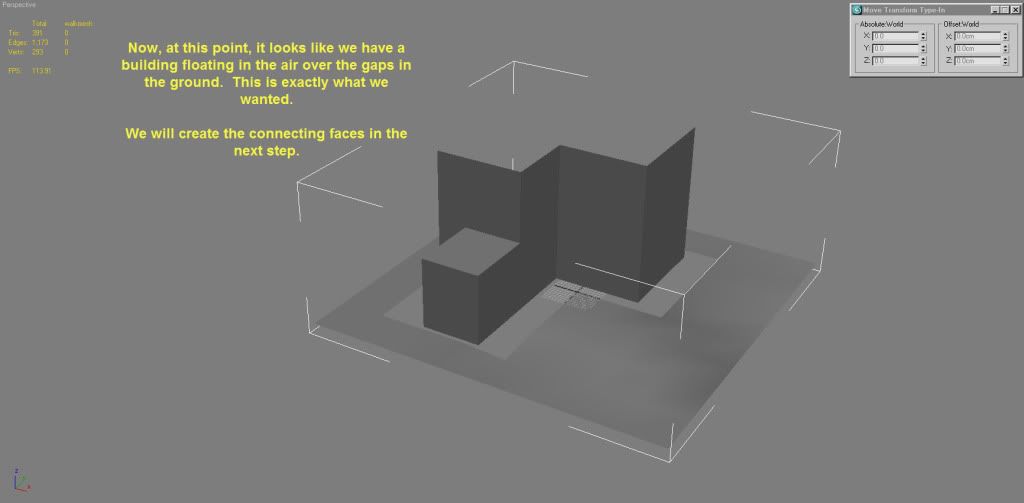
And same view, but with those extra faces deleted.

Image
CTP Team Lead

User avatar
Bannor Bloodfist
Posts: 1244
Joined: Fri Oct 09, 2009 11:45 pm
ctp: Yes
dla: Yes
TBotR: Yes
nwnihof: Yes

Re: Create a New tile or New Object

Post by Bannor Bloodfist »

Now that we have the object basically as we want it, we no longer need the "primitive" modifier, so let us select and collapse that.

Image
The result:

Image

Now I left the "top" of the building in place when I was deleting extra faces earlier. I will show you how to "Detach" that into a separate object that could be used later.

Image

I won't actually be using that object in this session, but it shows you another way to "create" objects from existing objects.


Now this building is still fairly boring, how about we add a "work bench" to one of the sides of it? Like maybe this could be used for a smithy or something? Now there are a couple ways to go about all of this, but I LOVE to cheat, and save steps wherever possible. In this case, instead of creating an entirely new primitive, and adjusting it so it correctly attaches to the building etc, we will cheat and use the "Extrude" option.

Image

Extrusion is VERY powerful in the long run, yet very simple to use. By extruding, we end up with an object that is either extended in one direction, or as in this case, properly attached (by vertice location) to prevent visible gaps in game.

Image

Now that I have "created" that work bench (roughly of course) I want to detach it as a separate object so that I can use a different texture on it.

Image

After detach, just to show how it was sliced away from the main building:
Image

Since this was extruded directly from the main building object, the corners and edges will be aligned perfectly with the main building, so I should not end up with any gaps.
CTP Team Lead

User avatar
Bannor Bloodfist
Posts: 1244
Joined: Fri Oct 09, 2009 11:45 pm
ctp: Yes
dla: Yes
TBotR: Yes
nwnihof: Yes

Re: Create a New tile or New Object

Post by Bannor Bloodfist »

Ok, I have re-textured the "workbench" just so it shows differently. My intention with this entire session is NOT to teach everything about texturing or even to finish this tile to actually use it in game. This is just a tutorial about the "basics" and some tricks I use to get a working tile.

So, here is the re-textured workbench.

Image


Anyway, enough with the building itself.

Looking and using a tile with completely flat ground is boring. I think you can agree that the only truly flat ground you find in real life has been leveled with a bulldozer by man... or is the flat terrain at a bottom of a dried up lake bed somewhere.

So, let's fix that. Remember this shot?

Image

That gives us quite a few vertices that we can adjust as needed.

Image

and now a shot after moving/adjusting some of the verts.

Image


So, now we have the basic tile, with a building and an attached object to the building.

We basically have a tile, except that you still can not use it in game, since you don't have a walkmesh.

Some folks will create a walkmesh from scratch, to me, that means much more work, with a hell of a lot of ways to screw it up. For me, I again CHEAT DAMNIT, I said CHEAT! ;)

What I do is take a copy of whatever objects in the tile that will affect the walkable space.
In this case, we are talking about the ground plane, the building, and the workbench. Select those three objects, and hide everything else.

So, we have the three objects selected, (4 if you include that flat roof object, which I did NOT include in my shots).

Image

Each of these cloned objects will be the name of the original plus some number, typically 01... IE building01 etc... At this stage it doesn't really matter as we will be changing the name of one of them and attaching the rest to it to create the wok.

So, select the ground plane, and rename it to walkmesh.

Image

So, now we have the ground plane copy renamed to walkmesh, with the two building objects attached. What this means is we now have a SINGLE object named walkmesh to work with.

This new walkmesh object has a long way to go before it is actually a walkmesh.

First thing I do is re-texture everything to a NON texture, one of those grey textures in your texture map window.

Hit "M" to open the material window, and choose one of the blank entries then hit "Assign Material to Selection" button as seen in this shot.

Image

This will assign that blank texture to the entire object. It just makes working with things easier for me, you can also leave the original materials assigned, if having the textures there makes it easier to see what you are doing.

Since we have cloned and attached several objects to create this walkmesh, we will have MANY extra faces that will have to be removed, the next couple shots will show what I mean.

Image
Image

Oops, I missed some, by turning the walkmesh upside down, I see that when I extruded the workbench, Max auto-generated bottom faces that also need to be deleted.

Image

Resulting view with missing faces:

Image

Walkmeshes can NOT have gaps like this, so we have to fix them.

Image
Image

Now we have all the faces created, and a basically solid wok, except that again, as we used copies and attached objects, we will have many instances of multiple vertices in locations where the different objects were touching. These verts all need to be welded together.

Image

Of course, the actual sound effects and what is walkable/non-walkable has NOT yet been set, so lets' fix that too.

Image

There are still some things that need to be done with this object now though.

Image
CTP Team Lead

User avatar
Bannor Bloodfist
Posts: 1244
Joined: Fri Oct 09, 2009 11:45 pm
ctp: Yes
dla: Yes
TBotR: Yes
nwnihof: Yes

Re: Create a New tile or New Object

Post by Bannor Bloodfist »

Now some notes;

1) Remember to collapse objects when you work with things like UVW modifiers etc... You should always end up with the "Aurora Trimesh" and "Editable Mesh" modifiers on the stack.

2) Use the Re-centering Pivots option when working with cloned/attached/detached/stretched objects.

3) Play around with the different primitives, they can be used for all sorts of things, and they are also somewhat complicated objects.

4) Extrusion is a powerful tool, and can be used for multiple things. It ALWAYS creates faces along the outside edges of the object you create. However, it will only create 2 faces per side, Ie, 2 triangles. So, if you are extruding a large distance, do it in steps. Extrude 100 cm, then Extrude an additional 100 cm, so you extrude it twice and end up with 4 faces on each side, each 100 cm on the extruded edge. This can be continued as long as you need it...

5) Use your imagination when creating things, and remember that objects can be used for different things than what you may originally think.

6) Have fun with it, you WILL run into some general frustrations, accept them as learning experiences, and don't throw in the towel too soon.

7) If you can't figure something out, please ask. There are folks out here that are willing to help you learn.

P.S. Please forgive anything I missed in this basic tutorial, and forgive any spelling errors or steps out of order etc.
CTP Team Lead

Post Reply